Ingredients
– 1 box fudgy brownie mix, 18.3 ounces gives the brownies a rich, dense texture that holds the egg shape well
– 2 large eggs help bind the batter and add structure
– 2/3 cup vegetable oil adds moisture and fudgy texture
– 3 tablespoons water helps bring the batter together
– 8 ounces cream cheese, softened creates the creamy filling for each brownie cavity
– 1/2 cup powdered sugar sweetens the frosting and helps it pipe smoothly
– 1 teaspoon vanilla adds warm flavor and rounds out the frosting
– 1 to 2 teaspoons festive sprinkles finishes the brownies with a fun holiday look
Instructions
1-First Step: Prep the molds and oven Start by lightly spraying 3, 8-slot egg-shaped silicone molds with nonstick spray. This helps the brownies release cleanly after baking, which matters when you want that egg-style shape to look neat. Preheat your oven to 350 F, or follow the temperature listed on your brownie mix box if it differs slightly. Having everything ready before you mix the batter makes the process smoother, especially if you are baking with kids or juggling a busy schedule.
2-Second Step: Mix the brownie batter Prepare the brownie batter according to the package instructions using the 18.3 ounce box fudgy brownie mix, 2 large eggs, 2/3 cup vegetable oil, and 3 tablespoons water. Stir until the batter is smooth and fully combined, but do not overmix. Overmixing can make the brownies less tender, and you want a rich, fudgy bite for this recipe. If you are using a homemade brownie batter, aim for a thick, dense consistency that can hold its shape in the molds.
3-Third Step: Fill the silicone molds Spoon the brownie batter into each cavity, filling each one about 3/4 full. That amount gives the brownies room to rise without spilling over the edges. Use a small cookie scoop or spoon for even portions so the brownies bake at the same pace. If you are making these for a party, even shapes help the final tray look polished and fun.
4-Fourth Step: Bake until just set Bake the brownies according to the package directions, which should be around 22 minutes at 350 F. The brownies are ready when a toothpick inserted into the center comes out with moist crumbs. You do not want wet batter, but you also do not want to overbake them. Keeping them fudgy gives better flavor and a sturdier shape for the frosting later. For a brownie nutrition reference, you can check a chocolate brownie guide like this chocolate brownie carb guide.
5-Fifth Step: Form the center cavity Remove the brownies from the oven and, while they are still warm, gently press a small cavity into the center of each brownie. A spoon handle, measuring spoon, or small round tool works well for this. Pressing while warm helps prevent cracking and gives you a clean spot for the frosting. This step is one of the most important parts of making Deviled Brownies look like deviled eggs.
6-Sixth Step: Cool completely Let the brownies cool completely before adding frosting. This step matters because warm brownies will soften the filling and can cause it to slide out of the cavity. If you are short on time, place the molds on a wire rack and let air circulate around them. You can also chill them briefly after they reach room temperature to make piping easier.
7-Seventh Step: Make the frosting In a medium bowl, beat the softened 8 ounces cream cheese, 1/2 cup powdered sugar, and 1 teaspoon vanilla until smooth and creamy. The frosting should be thick but pipeable. If it seems too soft, chill it for a few minutes before piping. If you want a colored filling, tint the frosting with a little food gel. This is a simple way to match holiday themes like spring pastels, Halloween orange, or Christmas red and green.
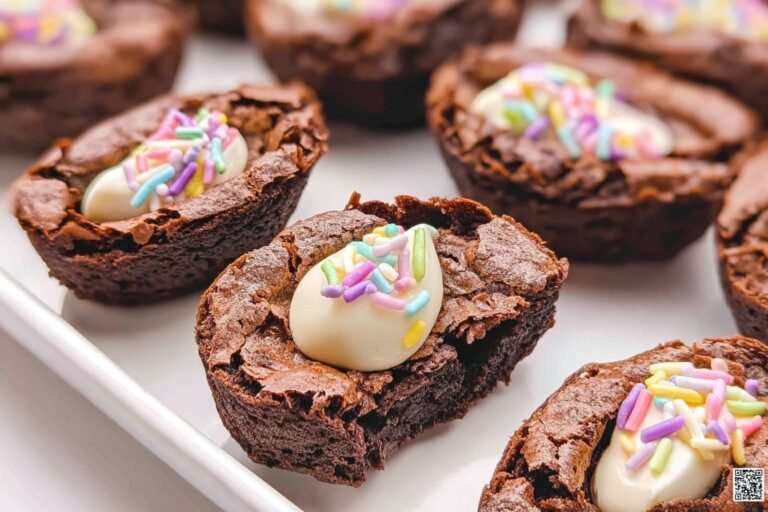
8-Eighth Step: Pipe and decorate Transfer the frosting to a piping bag fitted with a 1M tip. Pipe a swirl into each brownie cavity, just like you would with cupcake frosting. Top with 1 to 2 teaspoons festive sprinkles for a bright finishing touch. The piping bag gives the brownies a bakery-style look, but a zip-top bag with the corner snipped off can work in a pinch. For another easy party-friendly brunch option, check out this hashbrown egg casserole.
9-Ninth Step: Serve on a deviled egg tray Arrange the finished brownies on a deviled egg tray for the cutest presentation. The tray helps keep the egg shape theme going and makes serving easy for parties or gatherings. These brownies are best served chilled or at cool room temperature so the frosting stays firm and the shape holds well.
Last Step:
Please leave a rating and comment letting us know how you liked this recipe! This helps our business to thrive and continue providing free, high-quality recipes for you.Notes
🍫 Choose fudgy brownie mix for dense texture that holds egg shape perfectly.
🔥 Press cavities while brownies are warm to avoid cracking later.
🎨 Tint frosting with gel food coloring and match sprinkles to any occasion.
- Prep Time: 20 minutes
- Cook Time: 22 minutes
- Category: Dessert
- Method: Bake
- Cuisine: American
- Diet: Vegetarian
Nutrition
- Serving Size: 1 brownie
- Calories: 198 kcal
- Sugar: 14g
- Sodium: 99mg
- Fat: 12g
- Saturated Fat: 4g
- Unsaturated Fat: 8g
- Trans Fat: 0g
- Carbohydrates: 20g
- Fiber: 1g
- Protein: 2g
- Cholesterol: 25mg