Why You’ll Love This Limonnik Russian Lemon Pie
Looking for a dessert that perfectly balances sweet and tart while offering an irresistibly creamy texture? This traditional Limonnik Russian Lemon Pie might become your new favorite treat. Combining the bright, zesty flavor of whole lemons with a tender shortcrust pastry, this authentic Russian dessert delivers a unique taste experience that stands apart from typical lemon pies.
The beauty of this Limonnik Russian Lemon Pie lies in its simplicity and distinctive preparation method. Unlike other lemon desserts that use only juice or zest, this recipe purees the entire lemon (minus the seeds), creating a filling with depth and complexity that captures the essence of the fruit. This approach not only provides an intense citrus flavor but also makes preparation simpler and more straightforward.
“The pureed whole lemon filling gives Limonnik a characteristically tangy yet sweet flavor profile that’s impossible to forget after the first bite.”
What makes this zesty lemon pie truly special is its versatility. While traditional recipes call for specific ingredients and techniques, the basic structure of Limonnik welcomes adaptations and personal touches. Whether you’re experimenting with different sweeteners, adding complementary spices, or adjusting the tartness level to your preference, this Russian pastry provides a forgiving canvas for culinary creativity.
Perfect for any season and occasion, this creamy lemon pie brings brightness to winter days and refreshing coolness to summer gatherings. Its straightforward preparation and satisfying result make it ideal for both novice bakers looking to expand their repertoire and experienced cooks interested in exploring international desserts.
Essential Ingredients for Limonnik Russian Lemon Pie
The beauty of this authentic Limonnik Russian Lemon Pie lies in its simplicity. With just a handful of pantry staples and fresh lemons, you can create a dessert that captures the essence of Russian baking traditions. Below are the complete ingredients needed for both the dough and filling of this traditional Russian lemon pie recipe.
Dough Ingredients:
- 320 grams flour
- 150 grams cold butter
- 150 grams sour cream
- 2 grams baking soda
- A pinch of salt
- Additional flour for the work surface
Filling Ingredients:
- 1 organic lemon (with peel, seeds removed)
- 200 grams sugar
- 15 grams cornstarch
The quality of your ingredients directly impacts the final flavor of your Limonnik Russian Lemon Pie. Using an organic lemon is particularly important since the recipe requires pureeing the entire fruit, including the peel. Organic lemons ensure that no pesticide residues end up in your filling, making your dessert both safe and authentic to traditional recipes.
For the dough, cold butter is essential to achieve the characteristic crumbly texture of this Russian pastry. The cold butter creates pockets in the dough as it melts during baking, resulting in a tender yet sturdy crust that perfectly complements the zesty lemon filling.
| Component | Key Ingredients | Function |
|---|---|---|
| Dough | Flour, butter, sour cream | Creates a tender, crumbly shortcrust pastry |
| Filling | Whole lemon, sugar, cornstarch | Provides tangy flavor with thickened consistency |
Cornstarch in the filling serves a crucial purpose by thickening the lemon puree as it bakes, preventing a runny pie while maintaining the creamy texture that makes Limonnik so distinctive. Meanwhile, the sugar balances the natural tartness of the lemons, creating the perfect sweet-sour harmony that defines this traditional Russian dessert.
How to Prepare the Perfect Limonnik Russian Lemon Pie: Step-by-Step Guide
Creating this authentic Limonnik Russian Lemon Pie is simpler than you might think. The process combines basic pastry techniques with a straightforward filling method, resulting in a dessert that appears sophisticated but is approachable for bakers of all levels. Follow these detailed steps to craft a perfect Limonnik with its signature zesty flavor and creamy texture.
Preparing the Dough
Start by preparing the shortcrust pastry that will form both the base and top layer of your Russian lemon pie. In a mixing bowl, combine 320 grams of flour with a pinch of salt. Cut 150 grams of cold butter into small cubes and add it to the flour mixture. Using your fingertips or a pastry cutter, work the butter into the flour until the mixture resembles coarse crumbs.
In a separate small bowl, dissolve 2 grams of baking soda in 150 grams of sour cream. Pour this mixture into the flour and butter, then gently knead everything together until just combined. Be careful not to overwork the dough, as this could result in a tough crust.
“The secret to a tender, flaky pastry in Limonnik lies in minimal kneading and keeping ingredients cold throughout the process.”
Form the dough into a ball, wrap it in plastic wrap, and refrigerate for at least 30 minutes. This resting period allows the gluten to relax and the butter to firm up again, both essential for creating that perfect crumbly texture that characterizes traditional Limonnik Russian Lemon Pie.
Creating the Lemon Filling
While the dough chills, prepare the signature filling that makes this Russian lemon pie recipe stand out. Wash one organic lemon thoroughly, as you’ll be pureeing it with the peel intact. Cut the lemon into small pieces, carefully removing any seeds.
Place the lemon pieces (including the peel) into a food processor or blender and puree until completely smooth. This technique of using the entire lemon gives Limonnik its distinctive intense flavor and vibrant color that sets it apart from other lemon desserts.
It’s important to note that at this stage, you should keep the sugar separate from the lemon puree. Prematurely mixing them would release too much liquid from the lemons, potentially affecting the final texture of your creamy lemon pie. The 200 grams of sugar will be added just before assembly.
Assembling the Pie
Preheat your oven to 180°C (356°F) and prepare a 26 cm round springform tin. Remove the chilled dough from the refrigerator and divide it into two unequal portions approximately two-thirds for the base and one-third for the top.
On a lightly floured surface, roll the larger portion of dough into a circle slightly larger than your springform tin. Carefully transfer it to the tin, pressing it into the bottom and up the sides to create a small edge.
Sprinkle the bottom of the crust with 15 grams of cornstarch. This step is crucial as the cornstarch will help thicken any excess liquid released by the lemon filling during baking, ensuring the perfect creamy texture.
Just before spreading, mix the lemon puree with the 200 grams of sugar. Pour this mixture over the prepared crust, spreading it evenly. Then, roll the remaining dough piece large enough to cover the top of the pie. Place it over the filling, seal the edges firmly by pressing them together, and prick the surface with a fork to allow steam to escape during baking.
Baking to Perfection
Place the springform tin in the preheated oven and bake for approximately 30 minutes, or until the crust turns a golden brown color. The baking time may vary slightly depending on your oven, so keep an eye on the pie during the final minutes to prevent over-browning.
Once baked, remove the pie from the oven and let it cool completely in the tin before attempting to remove it. This cooling period, which takes about 30 minutes, is essential as it allows the filling to set properly, ensuring each slice maintains its shape when served.
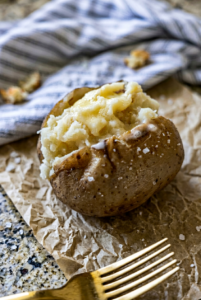
The finished Limonnik Russian Lemon Pie should have a golden, slightly crumbly crust with a vibrant filling that offers the perfect balance between sweet and tart. This traditional Russian pastry is best served at room temperature, allowing all the flavors to meld together for the ultimate taste experience.

Dietary Substitutions to Customize Your Limonnik Russian Lemon Pie
Though traditional Limonnik Russian Lemon Pie follows a specific recipe, this versatile dessert can be adapted to accommodate various dietary needs and preferences. Whether you’re following a specific diet or working with ingredient limitations, these substitution options will help you create a customized version of this creamy lemon pie that suits your lifestyle.
Gluten-Free Adaptations
For those with gluten sensitivities or celiac disease, creating a gluten-free Limonnik is surprisingly straightforward. Replace the all-purpose flour in the dough with a high-quality gluten-free flour blend designed for pastry making. Look for blends that contain xanthan gum or add 1/2 teaspoon of xanthan gum per cup of flour to improve the texture and binding.
When working with gluten-free dough, you may need to chill it for a longer period to make it easier to handle. Some gluten-free bakers also find that rolling the dough between two sheets of parchment paper prevents sticking and tearing more effectively than using a floured surface.
Dairy-Free and Vegan Options
Traditional Limonnik Russian Lemon Pie relies on butter and sour cream for its signature pastry texture. For a vegan version, substitute the butter with a high-quality plant-based butter alternative that remains solid at room temperature. Coconut oil can also work well, though it may impart a subtle coconut flavor to the final pastry.
Replace the sour cream with a dairy-free alternative such as coconut cream, cashew cream, or a commercial vegan sour cream product. When making these substitutions, the measurements remain the same, but you may need to adjust the chilling time slightly to achieve the right consistency in the dough.
Sugar Alternatives
The filling of this zesty lemon pie traditionally uses white sugar to balance the tartness of the lemons. For those monitoring sugar intake, several alternatives can work well:
- Coconut sugar: Use in a 1:1 ratio for a lower glycemic alternative with subtle caramel notes
- Stevia or erythritol blends: Follow package instructions as they vary by brand and formulation
- Maple syrup or honey: Reduce other liquids slightly if using these liquid sweeteners
When using alternative sweeteners, note that the flavor profile of your creamy lemon pie may change slightly. Coconut sugar adds depth, while stevia can sometimes have a slightly bitter aftertaste depending on the brand. You may need to experiment to find the perfect balance with the tart lemon puree.
Low-Carb Variations
For those following ketogenic or low-carbohydrate diets, transforming the Limonnik Russian Lemon Pie into a carb-friendly dessert requires a few strategic changes. Replace the flour in the crust with a combination of almond flour and coconut flour (ratio of 3:1), adding an extra egg or psyllium husk to improve binding.
In the filling, substitute sugar with a granular keto-friendly sweetener like erythritol or monk fruit sweetener. The lemon puree remains naturally low in carbs, making this component perfect for your dietary needs while still providing the characteristic zesty flavor of traditional Limonnik.
Mastering Limonnik Russian Lemon Pie: Advanced Tips and Variations
Once you’ve mastered the basic Limonnik Russian Lemon Pie recipe, you might want to elevate your baking game with these professional techniques and creative variations. These tips will help you refine your pie’s texture, experiment with new flavors, and present your dessert in impressive ways that highlight both its Russian heritage and your personal touch.
Perfecting the Pastry Technique
The ideal Limonnik Russian Lemon Pie features a crust that’s tender yet sturdy enough to hold the lemon filling without becoming soggy. To achieve this professional-quality pastry, be meticulous about your butter temperature. The butter must be cold when added to the flour, creating small pockets that steam during baking and result in a flaky texture.
Consider investing in a pastry scraper or bench knife for cutting the butter into the flour. This tool helps maintain the butter’s temperature by minimizing hand contact while ensuring even distribution throughout the flour. Professional bakers often swear by this method for achieving the most tender, flaky pastries.
Balancing Flavors Like a Pro
Traditional Limonnik Russian Lemon Pie strikes a delicate balance between sweet and tart, but professional bakers know that small adjustments can elevate this balance to perfection. Since the dough contains no sugar while the filling is quite tart, you have control over the final sweetness through the amount of sugar in the filling.
For a more complex flavor profile, consider using a combination of white sugar (for sweetness) and a small amount of light brown sugar (for depth). The subtle caramel notes from brown sugar complement the bright citrus flavor while adding dimension to the overall taste experience.
“The secret to an exceptional Limonnik lies in allowing the natural brightness of the lemon to shine while using just enough sugar to create a perfect equilibrium on the palate.”
Creative Flavor Combinations
While traditional Limonnik Russian Lemon Pie celebrates pure lemon flavor, advanced bakers often experiment with complementary ingredients that enhance rather than overwhelm the star citrus. Consider these professional variations:
- Herbal infusions: Add finely chopped rosemary or thyme to the filling for an aromatic complexity
- Spice additions: Incorporate a pinch of cardamom or ginger to complement the citrus brightness
- Nutty crust: Substitute a small portion of the flour with finely ground almonds for added texture and flavor
When adding these complementary flavors, exercise restraint to ensure they enhance rather than compete with the primary zesty lemon profile that defines this traditional Russian dessert.
Advanced Presentation Techniques
A professionally presented Limonnik Russian Lemon Pie makes a stunning statement on any dessert table. Instead of simply pricking holes in the top crust, consider creating a decorative lattice pattern or using pastry cutters to create vent holes in appealing shapes.
For an elegant finish, create a simple lemon glaze by whisking together powdered sugar and fresh lemon juice, then drizzling it artfully over the cooled pie. Alternatively, lightly dust the top with powdered sugar just before serving for a classic, refined appearance.
When serving, consider each plate as a canvas. A small dollop of crème fraîche, a few fresh berries, and a mint leaf can transform a simple slice of pie into a restaurant-quality dessert presentation.
How to Store Limonnik Russian Lemon Pie: Best Practices
Proper storage is essential for maintaining the delightful texture and flavor of your Limonnik Russian Lemon Pie. This traditional Russian dessert has specific storage requirements to keep the crust crisp and the filling perfectly set. Follow these guidelines to ensure your hard work in the kitchen continues to pay off with delicious results days after baking.
Short-Term Refrigeration
For storing your Limonnik Russian Lemon Pie for up to 3-4 days, refrigeration is the best option. Before placing the pie in the refrigerator, ensure it has cooled completely to room temperature. Wrapping warm desserts can trap condensation, potentially making the crust soggy.
Store the pie in an airtight container or cover it tightly with plastic wrap. If your springform pan has a tight-fitting lid, you can cover the pie directly in the pan before refrigerating. This method protects your zesty lemon pie from absorbing other flavors in your refrigerator while preventing the filling from drying out.
Long-Term Freezing
For longer storage, freezing is an excellent option that preserves both flavor and texture. Wrap the cooled pie securely in plastic wrap, ensuring all surfaces are covered. For additional protection against freezer burn, add a layer of aluminum foil over the plastic wrap before placing it in the freezer.
When properly stored, your Limonnik Russian Lemon Pie will maintain its quality for up to 2 months in the freezer. For convenience, consider cutting the pie into individual portions before freezing. This allows you to thaw only what you need while keeping the rest perfectly preserved.
To freeze effectively, label your wrapped pie with the date and contents. This prevents forgetting what’s in your freezer and helps you use the pie while it’s still at its best quality.
Thawing and Reheating
When you’re ready to enjoy your stored Limonnik Russian Lemon Pie, proper thawing is crucial for restoring its original texture and flavor. For best results, transfer the frozen pie from the freezer to the refrigerator and let it thaw overnight. This gradual thawing process helps maintain the integrity of both the crust and filling.
After thawing, if you prefer to serve your creamy lemon pie slightly warm, place individual slices in a low-temperature oven (around 275°F or 135°C) for 10-15 minutes. This gentle reheating helps crisp the crust without compromising the silky texture of the lemon filling.
Avoid using the microwave for reheating, as it tends to make the crust soggy while creating uneven heating in the filling. For a quick serving enhancement without reheating, consider garnishing with fresh lemon zest or a dusting of powdered sugar right before presenting your Limonnik Russian Lemon Pie.

FAQs: Frequently Asked Questions About Limonnik Russian Lemon Pie
What is Limonnik and how is it different from other lemon pies?
Why should I use organic lemons for making Limonnik filling?
What type of pastry is best for Limonnik and how do I make it?
How can I reduce the bitterness of lemon peel in Limonnik filling?
Can I store Limonnik, and how long does it stay fresh?

Limonnik Russian Lemon Pie
🍋 Enjoy the bright and refreshing sweet-sour taste of Limonnik, a classic Russian lemon pie with a zesty punch.
🥧 Experience a tender, crumbly shortcrust pastry filled with smooth lemon puree for a creamy, indulgent treat.
- Total Time: 1 hour 25 minutes
- Yield: 1 pie (26 cm round springform) 1x
Ingredients
320 grams flour
150 grams cold butter
150 grams sour cream
2 grams baking soda
A pinch of salt
Additional flour for the work surface
1 organic lemon (with peel, seeds removed)
200 grams sugar
15 grams cornstarch for thickening
Instructions
1-Preparing the Dough: Start by preparing the shortcrust pastry that will form both the base and top layer of your Russian lemon pie. In a mixing bowl, combine 320 grams of flour with a pinch of salt. Cut 150 grams of cold butter into small cubes and add it to the flour mixture. Using your fingertips or a pastry cutter, work the butter into the flour until the mixture resembles coarse crumbs.
2-Preparing the Dough: In a separate small bowl, dissolve 2 grams of baking soda in 150 grams of sour cream. Pour this mixture into the flour and butter, then gently knead everything together until just combined. Be careful not to overwork the dough, as this could result in a tough crust.
3-Preparing the Dough: Form the dough into a ball, wrap it in plastic wrap, and refrigerate for at least 30 minutes. This resting period allows the gluten to relax and the butter to firm up again, both essential for creating that perfect crumbly texture that characterizes traditional Limonnik Russian Lemon Pie.
4-Creating the Lemon Filling: While the dough chills, prepare the signature filling that makes this Russian lemon pie recipe stand out. Wash one organic lemon thoroughly, as you’ll be pureeing it with the peel intact. Cut the lemon into small pieces, carefully removing any seeds.
5-Creating the Lemon Filling: Place the lemon pieces (including the peel) into a food processor or blender and puree until completely smooth. This technique of using the entire lemon gives Limonnik its distinctive intense flavor and vibrant color that sets it apart from other lemon desserts.
6-Creating the Lemon Filling: It’s important to note that at this stage, you should keep the sugar separate from the lemon puree. Prematurely mixing them would release too much liquid from the lemons, potentially affecting the final texture of your creamy lemon pie. The 200 grams of sugar will be added just before assembly.
7-Assembling the Pie: Preheat your oven to 180°C (356°F) and prepare a 26 cm round springform tin. Remove the chilled dough from the refrigerator and divide it into two unequal portions approximately two-thirds for the base and one-third for the top.
8-Assembling the Pie: On a lightly floured surface, roll the larger portion of dough into a circle slightly larger than your springform tin. Carefully transfer it to the tin, pressing it into the bottom and up the sides to create a small edge.
9-Assembling the Pie: Sprinkle the bottom of the crust with 15 grams of cornstarch. This step is crucial as the cornstarch will help thicken any excess liquid released by the lemon filling during baking, ensuring the perfect creamy texture.
10-Assembling the Pie: Just before spreading, mix the lemon puree with the 200 grams of sugar. Pour this mixture over the prepared crust, spreading it evenly. Then, roll the remaining dough piece large enough to cover the top of the pie. Place it over the filling, seal the edges firmly by pressing them together, and prick the surface with a fork to allow steam to escape during baking.
11-Baking to Perfection: Place the springform tin in the preheated oven and bake for approximately 30 minutes, or until the crust turns a golden brown color. The baking time may vary slightly depending on your oven, so keep an eye on the pie during the final minutes to prevent over-browning.
12-Baking to Perfection: Once baked, remove the pie from the oven and let it cool completely in the tin before attempting to remove it. This cooling period, which takes about 30 minutes, is essential as it allows the filling to set properly, ensuring each slice maintains its shape when served.
Last Step:
Please leave a rating and comment letting us know how you liked this recipe! This helps our business to thrive and continue providing free, high-quality recipes for you.Notes
🍴 Knead the dough briefly to keep the crust tender and crumbly.
🍋 Use lemons with thin peels or briefly boil the peel in water then chill to reduce bitterness.
🍬 Add sugar to the lemon puree just before assembly to prevent excess liquid in the filling.
- Prep Time: 25 minutes
- Cooling time: 30 minutes
- Cook Time: 30 minutes
- Category: Dessert
- Method: Baking
- Cuisine: Russian
- Diet: Vegetarian
Nutrition
- Serving Size: 1 slice
- Calories: 280 kcal
- Sugar: 28 g
- Sodium: 120 mg
- Fat: 14 g
- Saturated Fat: 8 g
- Unsaturated Fat: 5 g
- Trans Fat: 0 g
- Carbohydrates: 34 g
- Fiber: 2 g
- Protein: 3 g
- Cholesterol: 45 mg