Why You’ll Love This Frozen Chocolate Pie
Frozen Chocolate Pie is the kind of dessert that works for busy nights, warm weather, and last-minute guests. It uses simple ingredients, comes together fast, and sets in the freezer while you focus on the rest of your meal. If you want a sweet treat that feels rich without a lot of work, this Frozen Chocolate Pie is a smart choice.
- Easy to make: You only need a microwave, one bowl, and a ready-to-use graham cracker crumb crust. The filling mixes in minutes, then the freezer does the rest.
- Rich chocolate flavor: The sweet chocolate baking bar with 48% cacao gives the pie a deep cocoa taste that pairs well with cream cheese and whipped topping.
- Great for make-ahead plans: This Frozen Chocolate Pie needs about 4 hours in the freezer, so you can make it earlier in the day or the night before.
- Simple for many home cooks: Busy parents, students, working professionals, and party hosts can all make this pie with very little fuss.
Tip: A frozen pie like this is a good choice when you want a cool dessert that slices cleanly and serves a crowd.
Chocolate fans who like creamy desserts will also enjoy reading chocolate banana overnight oats for another easy chocolate treat idea. For people curious about chocolate in a balanced diet, this article on is eating dark chocolate healthy offers useful background.
Essential Ingredients for Frozen Chocolate Pie
This Frozen Chocolate Pie recipe uses just a few pantry-friendly items. Each ingredient plays a clear role in the texture and flavor of the finished dessert. Use the full list below so the filling sets well and tastes smooth.
- 1 package sweet chocolate baking bar with 48% cacao – This gives the pie its main chocolate flavor and helps the filling set with a smooth, creamy texture.
- 1/3 cup milk, divided – The milk helps melt the chocolate and blends the filling into a softer, silkier mixture.
- 4 ounces cream cheese, softened – Softened cream cheese adds body, tang, and a cheesecake-style richness.
- 2 tablespoons sugar – Sugar balances the chocolate and cream cheese with a light sweetness.
- 2 cups whipped topping – Whipped topping makes the filling fluffy and gives the pie a lighter bite.
- 1 ready-to-use graham cracker crumb crust – The crust adds crunch and saves time because there is no need to bake a crust from scratch.
Special Dietary Options
- Vegan: Use dairy-free cream cheese, plant-based whipped topping, and a vegan chocolate bar. Choose a vegan graham-style crust if needed.
- Gluten-free: Use a certified gluten-free crumb crust in place of the graham cracker crust.
- Low-calorie: Use light cream cheese, sugar-free whipped topping, and a reduced-sugar chocolate bar if you want a lighter version.
| Ingredient | Role in the Pie | Easy Swap |
|---|---|---|
| Chocolate bar | Main flavor | Dark chocolate or vegan chocolate |
| Cream cheese | Rich, creamy texture | Light cream cheese or dairy-free cream cheese |
| Whipped topping | Lightens the filling | Plant-based whipped topping |
| Graham crust | Base and crunch | Gluten-free crumb crust |
How to Prepare the Perfect Frozen Chocolate Pie: Step-by-Step Guide
First Step: Melt the chocolate
Place the sweet chocolate baking bar and 2 tablespoons of the milk in a large microwaveable bowl. Microwave on high for 1 1/2 to 2 minutes, stirring after each minute. Stop when the chocolate is almost melted, then stir until it is fully smooth. This gentle melting method helps the chocolate stay glossy and prevents scorching.
Second Step: Mix in the cream cheese and sugar
Add the softened cream cheese, sugar, and the remaining milk to the melted chocolate. Beat the mixture with a wire whisk until it is well blended. The filling should look thick and smooth, with no visible lumps of cream cheese. If your cream cheese is still cold, let it sit at room temperature a little longer before mixing.
Third Step: Chill the chocolate base
Refrigerate the chocolate mixture for 10 minutes. This short chill helps the filling cool down before the whipped topping goes in. It also makes the texture a little firmer, which helps the final pie hold its shape.
Fourth Step: Fold in the whipped topping
Add 2 cups of whipped topping and stir gently until well blended. Use a light hand here so the filling stays airy. If you stir too hard, the mixture can lose some of its fluffy texture. The goal is a creamy chocolate filling that still feels soft and spoonable.
Fifth Step: Fill the crust
Spoon the filling into the ready-to-use graham cracker crumb crust. Spread it evenly with a spatula or the back of a spoon. Smooth the top so the pie freezes in a neat shape. If you want a more finished look, lightly tap the pie on the counter to remove any air pockets.
Sixth Step: Freeze until firm
Freeze the pie for 4 hours or until firm. This is the main setting time, so give it enough time to become sliceable. If you are making the pie for a party, freezing it overnight is fine too. Just cover it well so it stays fresh.
Final Step: Let it soften before slicing
Let the pie stand at room temperature or in the refrigerator for about 15 minutes, or until it can be cut easily. This short rest makes slicing cleaner and helps each piece keep its shape. Store any leftover pie in the freezer.
Best result: Mix gently after adding the whipped topping. That keeps the Frozen Chocolate Pie light and creamy.
If you enjoy no-bake desserts, you may also like the easy method used in blueberry muffins for another simple home recipe idea, even though it uses a different technique and baking style.

Dietary Substitutions to Customize Your Frozen Chocolate Pie
Protein and Main Component Alternatives
This dessert is flexible, even though the original recipe is simple. You can swap several parts of the filling to fit different needs or what you already have in the kitchen. If you want a richer pie, use dark chocolate instead of a sweet chocolate baking bar. If you want a lighter filling, use reduced-fat cream cheese and light whipped topping.
For a dairy-free pie, use plant-based cream cheese and whipped topping. If you need a gluten-free dessert, replace the ready-to-use graham cracker crumb crust with a certified gluten-free crust. These swaps change the final flavor a little, but they keep the same cool, frozen style.
Vegetable, Sauce, and Seasoning Modifications
This pie does not use vegetables or sauce, but you can still change the flavor in simple ways. Add a little vanilla extract if you want a softer chocolate taste. A spoonful of peanut butter gives the filling a nutty note that many chocolate lovers enjoy. You can also top the pie with chocolate shavings, crushed cookies, or a few chopped nuts before freezing.
If you like a sweeter pie, add a bit more sugar. If you prefer a deeper cocoa taste, use a darker chocolate bar. For another rich dessert idea, check out croissant bread for a comforting baked treat that works well for brunch or dessert tables.
Mastering Frozen Chocolate Pie: Advanced Tips and Variations
Pro cooking techniques
Keep the chocolate mixture moving while it melts so it heats evenly. A microwave-safe bowl with enough room for stirring works best. When you add the cream cheese, make sure it is soft so it blends fast and stays smooth. If the mixture looks a little thick after chilling, stir it gently before adding the whipped topping.
Flavor variations
You can make this Frozen Chocolate Pie feel new with small changes. Try a peanut butter swirl for a candy bar flavor. Add crushed chocolate cookies on top for extra crunch. A sprinkle of sea salt can also bring out the chocolate flavor. If you want a holiday version, top the pie with mint candies or chocolate curls.
Presentation tips
For cleaner slices, dip your knife in warm water and wipe it dry before each cut. Serve each piece on a chilled plate if you want the dessert to stay firm longer. A little whipped cream on top gives the pie a bakery look without much effort. Chocolate curls or shaved chocolate also make it look party ready.
Make-ahead options
This is a strong make-ahead dessert for busy schedules. Mix it in the morning and freeze it for dinner later that day, or make it the night before a gathering. Because it stores well in the freezer, it is a good choice for holidays, potlucks, and casual get-togethers.
How to Store Frozen Chocolate Pie: Best Practices
Store leftover Frozen Chocolate Pie in the freezer right away. Keep it in the crust pan or move slices to an airtight container if you want easier grab-and-go servings. For the best texture, wrap the pie well so it does not pick up freezer smells or ice crystals.
- Freezing: Freeze the whole pie for up to 2 weeks for the best texture, and longer if needed when wrapped tightly.
- Refrigeration: Keep slices in the refrigerator only for short term serving. The pie softens quickly, so it is best eaten soon after it comes out.
- Serving from frozen: Let the pie rest about 15 minutes before cutting so the slices come out clean.
- Meal prep: Make the pie ahead for parties, family dinners, or busy weekends when you want dessert ready to go.
For another cool recipe that works well on warm days, try a tropical smoothie when you want something refreshing and easy to serve.

FAQs: Frequently Asked Questions About Frozen Chocolate Pie
What is a frozen chocolate pie?
How do you make an easy frozen chocolate pie at home?
What ingredients do I need for a no-bake frozen chocolate pie?
How long does frozen chocolate pie last in the freezer?
Can I add peanut butter to frozen chocolate pie?

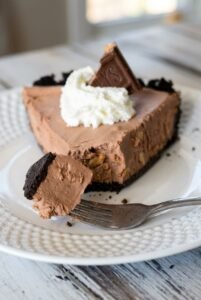
Frozen Chocolate Pie
🍫 Creamy, dreamy frozen chocolate pie – rich, no-bake bliss that beats ice cream any day!
🍨 Quick prep, make-ahead magic for parties – indulgent treat without oven heat!
- Total Time: 4 hours 30 minutes
- Yield: 8 servings
Ingredients
– 1 package sweet chocolate baking bar with 48% cacao for main flavor
– 1/3 cup milk, divided for melting chocolate
– 4 ounces cream cheese, softened for rich, creamy texture
– 2 tablespoons sugar for light sweetness
– 2 cups whipped topping for lightening the filling
– 1 ready-to-use graham cracker crumb crust for base and crunch
Instructions
1-First Step: Melt the chocolate Place the sweet chocolate baking bar and 2 tablespoons of the milk in a large microwaveable bowl. Microwave on high for 1 1/2 to 2 minutes, stirring after each minute. Stop when the chocolate is almost melted, then stir until it is fully smooth. This gentle melting method helps the chocolate stay glossy and prevents scorching.
2-Second Step: Mix in the cream cheese and sugar Add the softened cream cheese, sugar, and the remaining milk to the melted chocolate. Beat the mixture with a wire whisk until it is well blended. The filling should look thick and smooth, with no visible lumps of cream cheese. If your cream cheese is still cold, let it sit at room temperature a little longer before mixing.
3-Third Step: Chill the chocolate base Refrigerate the chocolate mixture for 10 minutes. This short chill helps the filling cool down before the whipped topping goes in. It also makes the texture a little firmer, which helps the final pie hold its shape.
4-Fourth Step: Fold in the whipped topping Add 2 cups of whipped topping and stir gently until well blended. Use a light hand here so the filling stays airy. If you stir too hard, the mixture can lose some of its fluffy texture. The goal is a creamy chocolate filling that still feels soft and spoonable.
5-Fifth Step: Fill the crust Spoon the filling into the ready-to-use graham cracker crumb crust. Spread it evenly with a spatula or the back of a spoon. Smooth the top so the pie freezes in a neat shape. If you want a more finished look, lightly tap the pie on the counter to remove any air pockets.
6-Sixth Step: Freeze until firm Freeze the pie for 4 hours or until firm. This is the main setting time, so give it enough time to become sliceable. If you are making the pie for a party, freezing it overnight is fine too. Just cover it well so it stays fresh.
7-Final Step: Let it soften before slicing Let the pie stand at room temperature or in the refrigerator for about 15 minutes, or until it can be cut easily. This short rest makes slicing cleaner and helps each piece keep its shape. Store any leftover pie in the freezer.
Last Step:
Please leave a rating and comment letting us know how you liked this recipe! This helps our business to thrive and continue providing free, high-quality recipes for you.Notes
🍫 Microwave chocolate in short intervals, stirring often, to prevent scorching.
🕒 Allow 15 minutes thaw time at room temp for perfect slices without cracking.
❄️ Wrap leftovers tightly and store in freezer up to 1 month for fresh taste.
- Prep Time: 20 minutes
- Freeze: 4 hours
- Category: Dessert
- Method: No Bake
- Cuisine: American
- Diet: Vegetarian
Nutrition
- Serving Size: 1 slice
- Calories: 350 calories
- Sugar: 25g
- Sodium: 200mg
- Fat: 25g
- Saturated Fat: 15g
- Unsaturated Fat: 8g
- Trans Fat: 0g
- Carbohydrates: 30g
- Fiber: 1g
- Protein: 4g
- Cholesterol: 30mg