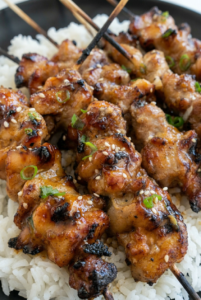
Why You’ll Love This Easy Balsamic Chicken Skewers
Looking for a delicious meal that comes together with minimal fuss? Easy Balsamic Chicken Skewers should definitely be on your radar this week! These perfect bites of seasoned chicken and colorful veggies are not only stunning to look at but are packed with incredible flavors that will have everyone at the table reaching for seconds.
What makes this easy balsamic chicken skewers recipe special? Let me count the ways:
- Ease of preparation: This recipe is quick and simple, perfect for busy weeknights. The marinating and cooking process is straightforward, allowing you to enjoy delicious balsamic chicken skewers in just over an hour.
- Health benefits: Made with lean chicken breast and wholesome balsamic vinegar, this dish supports a nutritious diet. It’s rich in protein and low in unhealthy fats, promoting wellness and balanced eating. Chicken is an excellent source of lean protein that helps build muscle and keeps you feeling full longer.
- Versatility: Adaptable to various dietary preferences, this easy balsamic chicken skewers recipe accommodates gluten-free, low-calorie, and even vegan swaps, making it a flexible meal option.
- Distinctive flavor: The combination of tangy balsamic vinegar and complementary herbs delivers a unique, savory taste that elevates simple grilled chicken skewers to an irresistible dish.
These grilled balsamic chicken skewers strike the perfect balance between sweet and savory, making them a hit with both adults and kids. They’re the kind of dish that looks fancy but is surprisingly simple to prepare perfect for everything from a casual weeknight dinner to a weekend barbecue with friends!
Essential Ingredients for Easy Balsamic Chicken Skewers
The magic of these weeknight balsamic chicken skewers starts with quality ingredients brought together in perfect harmony. Here’s everything you’ll need to create this delicious dish:
Chicken
- 2.5 lbs boneless skinless chicken breasts, cut into 1″ cubes
Vegetables
- 2 red peppers, cut into cubes
- 1 yellow pepper, cut into cubes
- 1 red onion, cut into cubes
- 1 pint cherry tomatoes
- 1 squash, cut into 1/2″ slices
- 2 zucchini, cut into 1/2″ slices
Balsamic Marinade
- 1/4 cup balsamic vinegar
- 1/4 cup olive oil
- 1 tablespoon Dijon mustard
- 1 tablespoon honey
- 1 teaspoon dry basil
- Salt and pepper to taste
The quality of your balsamic vinegar can make or break this recipe! Traditional balsamic vinegar not only adds fantastic flavor but also provides antioxidant properties and can aid in digestion.
How to Prepare the Perfect Easy Balsamic Chicken Skewers: Step-by-Step Guide
These balsamic chicken skewers come together in just a few simple steps. Follow this guide for perfectly grilled skewers every time!
Step 1: Make the Marinade
In a small bowl, whisk together balsamic vinegar, Dijon mustard, honey, dry basil, salt, and pepper. Slowly drizzle in olive oil while whisking to emulsify. The mixture will become slightly thickened and glossy that’s exactly what you want!
Step 2: Marinate the Chicken
Place chicken cubes in a large bowl. Pour half of the marinade over the chicken, reserving the remaining half. Toss to coat thoroughly. Cover with plastic wrap and refrigerate for 30 minutes. This short marinating time is perfect when you’re hungry, but if you want even more flavor, you can marinate for up to 24 hours.
Step 3: Preheat the Grill
Preheat your grill to medium-high heat (375-400°F). While the grill is heating, you can prepare your vegetables by cutting them into the specified sizes.
Step 4: Assemble the Kabobs
Once your chicken has marinated, it’s time to assemble the kabobs. Thread marinated chicken and prepared vegetables alternately onto skewers. Try to keep everything evenly spaced for the best cooking results.
Step 5: Grill the Kabobs
Place the kabobs on the preheated grill and cook for 3-4 minutes per side, until they develop beautiful char marks. During grilling, brush the kabobs with the reserved marinade for extra flavor. After the initial grilling on all sides, cook for an additional 2 minutes to ensure the chicken is cooked through.
Step 6: Serve and Enjoy
Remove the kabobs from the grill and let them rest for 5-10 minutes before serving. This important step allows the juices to redistribute, ensuring tender, juicy chicken in every bite. Serve with your favorite sides and enjoy!
Preparation Time:
- Total Time: 1 hour 10 minutes
- Prep Time: 50 minutes
- Cook Time: 20 minutes
Expert Tips for Achieving Perfectly Grilled Kabobs
Want to take your weeknight balsamic chicken skewers from good to amazing? These pro tips will help you achieve restaurant-quality results right in your own backyard:
- Clean grill grates: Ensure the grill grates are clean and well-oiled before cooking to prevent kabobs from sticking. No one wants to lose their perfectly threaded chicken and veggies to the grill!
- Uniform pieces: Cut chicken and vegetables into uniform-sized pieces for even cooking. This ensures everything finishes at the same time, preventing overcooked veggies or undercooked chicken.
- Don’t skip marinating: Marinating the chicken is essential for tenderness and flavor; do not skip this step. Even a quick 30-minute soak makes a noticeable difference!
- Brush with reserved marinade: Brushing the kabobs with the reserved marinade while grilling enhances the balsamic flavor and creates a beautiful caramelized exterior.
- Let them rest: Allow the grilled chicken kabobs to rest for 5-10 minutes before serving. This patience pays off with juicier, more flavorful results.
Did you know? Balsamic vinegar contains powerful antioxidants called polyphenols that might help protect your heart and circulation. Adding this flavorful ingredient to your marinade not only tastes amazing but can offer some health benefits too!
Nutritional Information and Dietary Considerations
One of the best things about these easy balsamic chicken skewers is how well they fit into a balanced diet. Let’s break down the nutritional information per serving:
| Nutrient | Amount per Serving |
|---|---|
| Serving Size | 1.5 cups |
| Calories | 251 |
| Sugar | 7 g |
| Sodium | 365 mg |
| Fat | 10 g |
| Saturated Fat | 1 g |
| Carbohydrates | 11 g |
| Fiber | 2 g |
| Protein | 30 g |
| Cholesterol | 81 mg |
With 30 grams of protein per serving, these easy balsamic chicken skewers provide a substantial amount of this essential nutrient, making them perfect for fueling your body after a workout or supporting muscle health. The dish is relatively low in calories and fat while providing a healthy balance of macronutrients.
The colorful vegetables contribute important vitamins, minerals, and antioxidants, while the balsamic vinegar adds flavor without excessive calories. For those watching their sodium intake, you can reduce the salt in the marinade and still enjoy delicious results!

Dietary Substitutions to Customize Your Easy Balsamic Chicken Skewers
These versatile balsamic chicken skewers can easily be adapted to accommodate various dietary preferences and restrictions. Here are some simple substitutions to customize your meal:
Protein Alternatives
- For a vegan option: Replace chicken with firm tofu or tempeh, marinated in the same balsamic mixture to mimic flavor and texture. Be sure to press the tofu first to remove excess water.
- For pescatarians: Substitute chicken with firm white fish chunks or shrimp, adjusting cooking time accordingly. Shrimp will cook much faster than chicken, so keep a close eye on them!
- For those avoiding poultry: Pork tenderloin or beef sirloin cubes work well with this balsamic marinade and can be cooked using the same method.
Vegetable and Seasoning Modifications
- Garlic alternatives: Swap out garlic for shallots or onions if preferred or for varied flavor profiles.
- Fresh herbs: Use fresh herbs like rosemary or thyme instead of dried basil for a seasonal twist. Fresh herbs will add a bright, vibrant flavor to your skewers.
- Gluten-free considerations: Opt for a certified gluten-free balsamic vinegar to ensure the recipe is safe for gluten intolerance. Most balsamic vinegars are naturally gluten-free, but some cheaper brands might contain additives.
- Customize your marinade: Modify the sauce by adding a touch of honey or maple syrup for sweetness or chili flakes for heat, tailoring to taste preferences.
Mastering Easy Balsamic Chicken Skewers: Advanced Tips and Variations
Once you’ve mastered the basic recipe for these easy balsamic chicken skewers, you might want to experiment with different flavors and techniques. Here are some advanced tips and variations to take your grilling game to the next level:
Pro Cooking Techniques
Use a two-zone cooking method on your grill, searing skewers over high heat first then finishing on a cooler side to ensure juiciness without burning. This professional technique gives you the best of both worlds a beautifully caramelized exterior and tender, juicy interior.
Flavor Variations
Experiment with adding smoked paprika, cumin, or fresh basil to the marinade for unique taste profiles. A little smoked paprika can add a depth of flavor that makes these skewers taste like they’ve been slow-cooked over a wood fire!
Presentation Tips
Serve your skewers on a wooden plank or colorful platter garnished with fresh herbs and lemon wedges for a striking visual appeal. For a fun presentation at parties, set up a “kabob bar” where guests can assemble their own skewers with their preferred combination of proteins and vegetables.
Make-Ahead Options
Marinate the chicken overnight to deepen flavors and prep skewers a few hours before cooking, storing covered in the fridge to save time. This makes these easy balsamic chicken skewers perfect for entertaining you can do most of the work ahead of time and simply grill when your guests arrive.
How to Store Easy Balsamic Chicken Skewers: Best Practices
Whether you’re planning for leftovers or prepping meals in advance, proper storage is key to maintaining the quality and safety of your easy balsamic chicken skewers. Here’s how to handle them:
Refrigeration
Store cooked skewers in an airtight container in the fridge for up to 3-4 days to maintain freshness. For best results, remove the chicken and vegetables from the skewers before storing, as this helps prevent the ingredients from drying out.
Freezing
Wrap skewers tightly in foil or freezer-safe bags and freeze for up to 2 months; thaw overnight in the refrigerator before reheating. If you know you’ll be freezing the skewers, consider slightly undercooking the chicken during the initial grilling, as it will finish cooking during the reheating process.
Reheating
Reheat gently in an oven set at 350°F (175°C) or on a grill to restore crispness without drying out the meat. Avoid using the microwave, which can make the chicken rubbery and the vegetables soggy.
Meal Prep Considerations
Cook skewers in batches and store portions separately to simplify healthy meal planning throughout the week. Pair with pre-cooked grains like quinoa or rice for complete, ready-to-eat meals that just need a quick reheating.
Serving Suggestions and Pairings
These versatile easy balsamic chicken skewers pair wonderfully with a variety of sides and beverages. Here are some serving suggestions to complete your meal:
Beverage Pairings
Cool down with a refreshing Brazilian lemonade, which offers a delightful contrast to the savory flavors of the balsamic chicken. For adults, a crisp white wine like Pinot Grigio or a light red like Pinot Noir complements the flavors beautifully.
Side Dish Ideas
- A light cucumber and dill salad for a refreshing contrast
- Creamy polenta or mashed potatoes to soak up the delicious juices
- Grilled corn on the cob with a sprinkle of cotija cheese and lime
- A fresh mixed greens salad with a simple vinaigrette
- Fluffy rice or quinoa seasoned with herbs
Sauce Accompaniments
While the balsamic marinade provides plenty of flavor, you might want to serve these skewers with additional dipping sauces:
- Extra balsamic glaze reduced on the stovetop until slightly thickened
- A creamy yogurt-based sauce with garlic and herbs
- A zesty chimichurri sauce for a fresh herbaceous kick
- Honey mustard sauce for those who enjoy a touch of sweetness

FAQs: Frequently Asked Questions About Easy Balsamic Chicken Skewers
What type of chicken is best for balsamic chicken skewers?
How long should I marinate chicken for balsamic skewers?
Which vegetables work well on balsamic chicken skewers?
Can I use wooden or metal skewers for grilling balsamic chicken?
Can balsamic chicken skewers be prepared ahead of time?

Easy Balsamic Chicken Skewers
🍡 A flavorful and healthy dinner option that combines tender chicken with colorful vegetables in a sweet and tangy balsamic glaze
🔥 Perfect for busy weeknights with simple preparation and quick cooking time on the grill
- Total Time: 1 hour 10 min
- Yield: 6 servings 1x
Ingredients
2.5 lbs boneless skinless chicken breasts
2 red peppers
1 yellow pepper
1 red onion
1 pint cherry tomatoes
1 squash
2 zucchini
1/4 cup balsamic vinegar
1/4 cup olive oil
1 tablespoon Dijon mustard
1 tablespoon honey
1 teaspoon dry basil
Salt and pepper
Instructions
Step 1: Make the Marinade In a small bowl, whisk together balsamic vinegar, Dijon mustard, honey, dry basil, salt, and pepper. Slowly drizzle in olive oil while whisking to emulsify. The mixture will become slightly thickened and glossy that’s exactly what you want!
Step 2: Marinate the Chicken Place chicken cubes in a large bowl. Pour half of the marinade over the chicken, reserving the remaining half. Toss to coat thoroughly. Cover with plastic wrap and refrigerate for 30 minutes. This short marinating time is perfect when you’re hungry, but if you want even more flavor, you can marinate for up to 24 hours.
Step 3: Preheat the Grill Preheat your grill to medium-high heat (375-400°F). While the grill is heating, you can prepare your vegetables by cutting them into the specified sizes.
Step 4: Assemble the Kabobs Once your chicken has marinated, it’s time to assemble the kabobs. Thread marinated chicken and prepared vegetables alternately onto skewers. Try to keep everything evenly spaced for the best cooking results.
Step 5: Grill the Kabobs Place the kabobs on the preheated grill and cook for 3-4 minutes per side, until they develop beautiful char marks. During grilling, brush the kabobs with the reserved marinade for extra flavor. After the initial grilling on all sides, cook for an additional 2 minutes to ensure the chicken is cooked through.
Step 6: Serve and Enjoy Remove the kabobs from the grill and let them rest for 5-10 minutes before serving. This important step allows the juices to redistribute, ensuring tender, juicy chicken in every bite. Serve with your favorite sides and enjoy!
Last Step:
Please leave a rating and comment letting us know how you liked this recipe! This helps our business to thrive and continue providing free, high-quality recipes for you.Notes
🍢 Ensure the grill grates are clean and well-oiled before cooking to prevent kabobs from sticking
🔪 Cut chicken and vegetables into uniform-sized pieces for even cooking throughout
⏰ Marinating the chicken is essential for tenderness and flavor; do not skip this step
- Prep Time: 50 min
- Marinating time: 30 min
- Cook Time: 20 min
- Category: Main Course
- Method: Grilling
- Cuisine: Mediterranean
- Diet: High-Protein, Gluten-Free
Nutrition
- Serving Size: 1.5 cups
- Calories: 251
- Sugar: 7 g
- Sodium: 365 mg
- Fat: 10 g
- Saturated Fat: 1 g
- Unsaturated Fat: 8 g
- Trans Fat: 0 g
- Carbohydrates: 11 g
- Fiber: 2 g
- Protein: 30 g
- Cholesterol: 81 mg